The Complete Guide to Dev Containers in Ruby on Rails
From basic setup to advanced MCP integration: using Dev Containers for portable development environments that eliminate "works on my machine" problems.

Dev Containers are a lightweight, semi-standardized way to provision robust development environments for applications. They can be run locally, or in a cloud environment like Github Codespaces.
Rails itself provides dev container images and features, and even a tool to create a Rails application without any prerequisites on your machine besides Docker being installed (rails-new). Additionally, you can pass --devcontainer to rails new when starting out with a greenfield Rails app.
So let’s go and see what it’s all about.
What Are Dev Containers?
In a nutshell, dev containers provide a standardized way to define portable, reproducible development environments using (Docker) containers. To define such an environment, you have to specify it in the devcontainer.json file, which describes how the environment should be built and run. For example, a minimal Ruby setup might look like this:
{
  "name": "Ruby App",
  "features": {
    "ghcr.io/devcontainers/features/ruby:1": {
      "version": "3.4"
    }
  },
  "customizations": {
    "vscode": {
      "extensions": [
        "Shopify.ruby-lsp"
      ]
    }
  },
  "postCreateCommand": "bundle install"
}
Here we’re using the Ruby Feature to install version 3.4, preloading some helpful VS Code extensions (ruby-lsp in this example), and running bundle install after setup.
The specification defines two abstractions that can help with constructing your dev containers: Features and Templates. Let’s take a brief look at those.
Features
Features are small, composable building blocks that can be added to any dev container. Each one encapsulates a tool or service—like Ruby, Node.js, Docker-in-Docker, or PostgreSQL client utilities — and handles the installation logic for you. Instead of writing custom Dockerfile steps or shell scripts, you simply declare the feature and its version in devcontainer.json, and it’s installed automatically. Features can be combined, so you can build up exactly the toolchain your project needs with just a few lines of configuration. As we will see later, devcontainers are built upon special base images (see https://github.com/devcontainers/images) that allow stacking features upon each other.
Templates
Templates are starting points that bundle a pre-configured devcontainer.json with a curated set of features and sensible defaults for a particular language or framework. For example, a Python template might include the Python Feature, VS Code extensions for linting and debugging, and a default port mapping. Using a template means you can spin up a ready-to-use development environment for common stacks in seconds, and then customize it further with features or project-specific tweaks. In a nutshell, templates are what you would use to distribute a whole development stack across your whole organization. How they are composed is beyond the scope of this tutorial, but feel encouraged to look at the specification for reference.
Together, these building blocks make it possible to share consistent, reproducible environments across machines, editors, and teams with almost no setup overhead.
Creating a Rails Application with Dev Container Support
Let’s see what it takes to create a Ruby on Rails app with support for dev containers. As it turns out, rails new accepts a --devcontainer flag that provides the necessary boilerplate for us:
$ rails new scratch --devcontainer
Note: If you want to add a devcontainer to an existing Rails project, the easiest way is to start a new one and copy over the .devcontainer folder. That should set you up because it’s self-contained.
All that’s necessary to start a dev container (or multiple ones) is contained in the .devcontainer directory. Let’s take a look at the contents:
$ ls  .devcontainer/
compose.yaml       devcontainer.json  Dockerfile
That looks lightweight enough! Let’s dig deeper and look at the innards:
The devcontainer.json File
// For format details, see https://containers.dev/implementors/json_reference/.
// For config options, see the README at: https://github.com/devcontainers/templates/tree/main/src/ruby
{
  "name": "scratch",
  "dockerComposeFile": "compose.yaml",
  "service": "rails-app",
  "workspaceFolder": "/workspaces/${localWorkspaceFolderBasename}",

  // Features to add to the dev container. More info: https://containers.dev/features.
  "features": {
    "ghcr.io/devcontainers/features/github-cli:1": {},
    "ghcr.io/rails/devcontainer/features/activestorage": {},
    "ghcr.io/devcontainers/features/docker-outside-of-docker:1": {},
    "ghcr.io/rails/devcontainer/features/sqlite3": {}
  },

  "containerEnv": {
    "CAPYBARA_SERVER_PORT": "45678",
    "SELENIUM_HOST": "selenium",
    "KAMAL_REGISTRY_PASSWORD": "$KAMAL_REGISTRY_PASSWORD"
  },

  // Use 'forwardPorts' to make a list of ports inside the container available locally.
  "forwardPorts": [3000],

  // Configure tool-specific properties.
  // "customizations": {},

  // Uncomment to connect as root instead. More info: https://containers.dev/implementors/json_reference/#remoteUser.
  // "remoteUser": "root",


  // Use 'postCreateCommand' to run commands after the container is created.
  "postCreateCommand": "bin/setup --skip-server"
}
We have a couple of things to unpack here. First of all, the config file is referring to a dockerComposeFile called compose.yaml, which is also present in the folder. Then, it references a service called rails-app, which is defined in that same Docker compose configuration. The workspaceFolder is the mount point where the project root directory should be accessible inside the container. The convention is to put it under /workspaces/.
Skipping the features for a second, we can see that the containerEnv object holds environment variables for running Capybara as well as deployment with Kamal (we will look at them in detail when discussing compose.yaml). You will want to include any additional environment variables necessary to provision your application here.
The postCreateCommand specified bin/setup with the --skip-server option set, which ensures that all dependencies are installed and database migrations are run once the container is started.
Finally let’s look at which features are included in this dev container:
- the
github-clifeature simply installs the Github CLI into the container, which is useful if you’re used to working with it. I usually delete this line. - the
activestoragefeature is provided by Rails proper, and makes sure all the tooling to transform images and videos are installed. This is a good moment to look into the install script that every dev container feature needs to provide. In this case it installs imagemagick, ffmpeg etc. to work with attachment variants. Note that the dev container environment simply orchestrates the stacking of features, so it’s fine to put any additionalapt-getcommands here instead of the Dockerfile. The goal of features is composability. docker-outside-of-dockeressentially allows to reuse the Docker installation running on your host computer inside the container. This is necessary to deploy applications with Kamal if you use a local builder, for example.- sqlite3, as you might have guessed, provides the dependencies to run Sqlite3. You can again inspect the details in the install script.
The compose.yaml Configuration
We have seen that the dev container configuration mentions two services: rails-app and selenium. While we can probably guess what they’re for, let’s look inside the Docker compose file to inspect the details:
name: "scratch"

services:
  rails-app:
    build:
      context: ..
      dockerfile: .devcontainer/Dockerfile

    volumes:
    - ../..:/workspaces:cached

    # Overrides default command so things don't shut down after the process ends.
    command: sleep infinity

    # Uncomment the next line to use a non-root user for all processes.
    # user: vscode

    # Use "forwardPorts" in **devcontainer.json** to forward an app port locally.
    # (Adding the "ports" property to this file will not forward from a Codespace.)
    depends_on:
    - selenium

  selenium:
    image: selenium/standalone-chromium
    restart: unless-stopped
First, the rails-app services specifies how the app image is to be built: The file context is the app’s root directory, which is below the .devcontainer one, hence the ... From that vantage point the dockerfile is then identified, as the one in said .devcontainer folder.
Next, it designates the parent folder of your Rails app as the root workspace folder to be mounted as the workspaces volume inside the container. You might want to change this setting if it doesn’t fit your structure. It also sets the :cached consistency mode which significantly boosts reads from the volume, but writes may take a moment to propagate. If you notice odd delays, try removing :cached.
The sleep infinity command that’s issued once the container spins up takes a bit of explanation. You might have expected that the Rails application is spun up here, but remember, this container is not primarily for running the app, but for developing it. As such it would be presumptuous for the container to instantly run the app, as it might not even be in a runnable state and crash. So sleep infinity essentially ensures that the development container is available and doesn’t shut down instantly after starting. You can then start the development server inside that container - we will see how this is accomplished in a second.
Let’s first finish our walkthrough of the .devcontainer folder though.
The Bespoke Dockerfile
# Make sure RUBY_VERSION matches the Ruby version in .ruby-version
ARG RUBY_VERSION=3.4.1
FROM ghcr.io/rails/devcontainer/images/ruby:$RUBY_VERSION
This minimalistic Dockerfile just uses the Ruby container image supplied by the Rails team. Any additional Linux packages necessary to run your application will also go in here.
Note: this Dockerfile is only for the dev container. Your production build should use the Dockerfile in your app’s root.
Now let’s take first look at the running container. First, make sure that Docker is running on your machine:
$ docker ps
CONTAINER ID   IMAGE
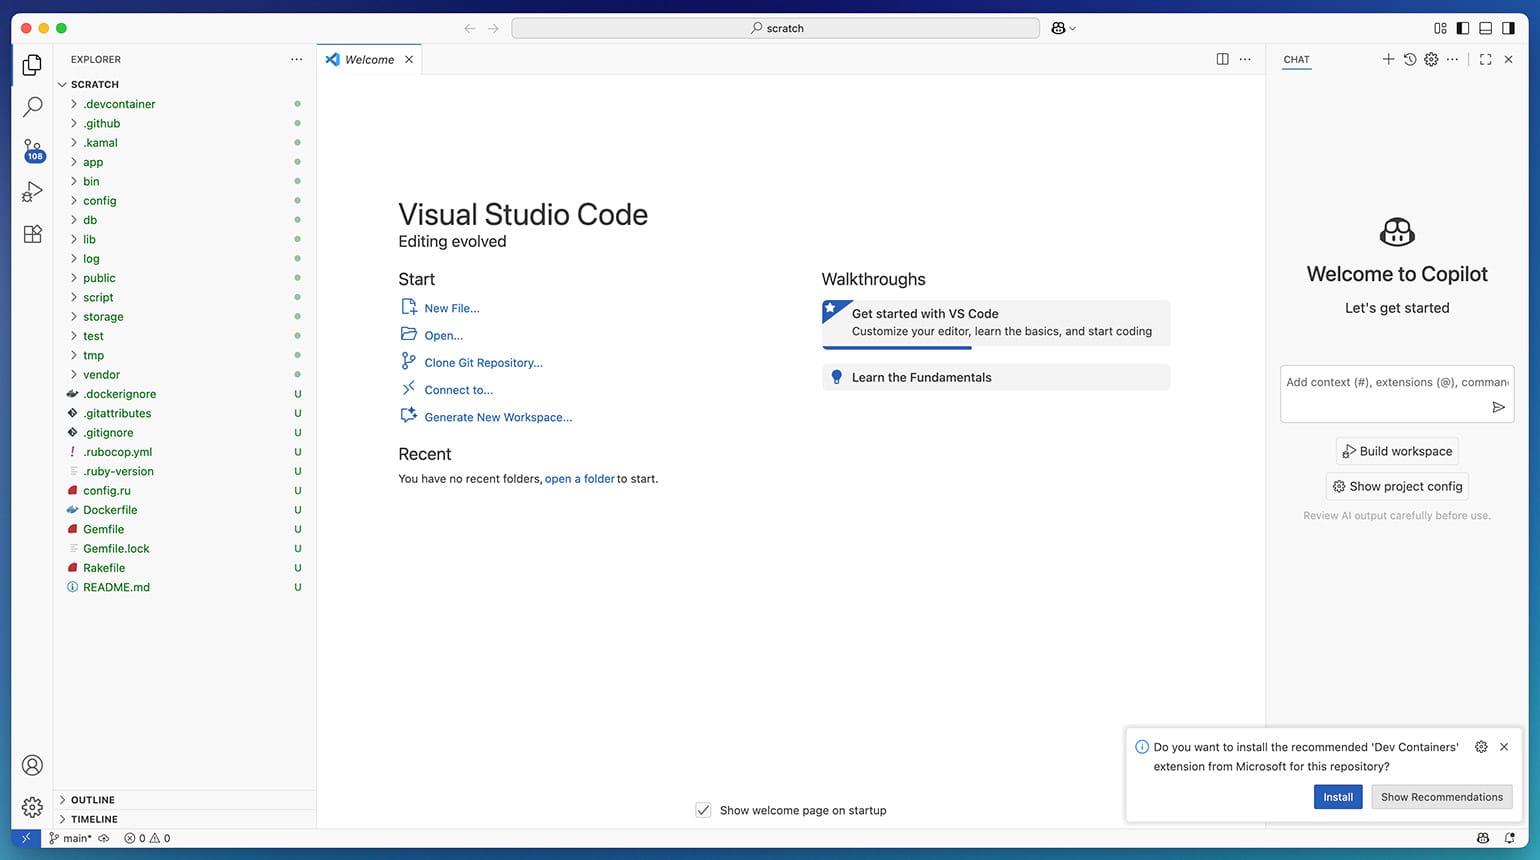
Then start Visual Studio Code for a first test (don’t worry, we’ll cover other options later):
code .
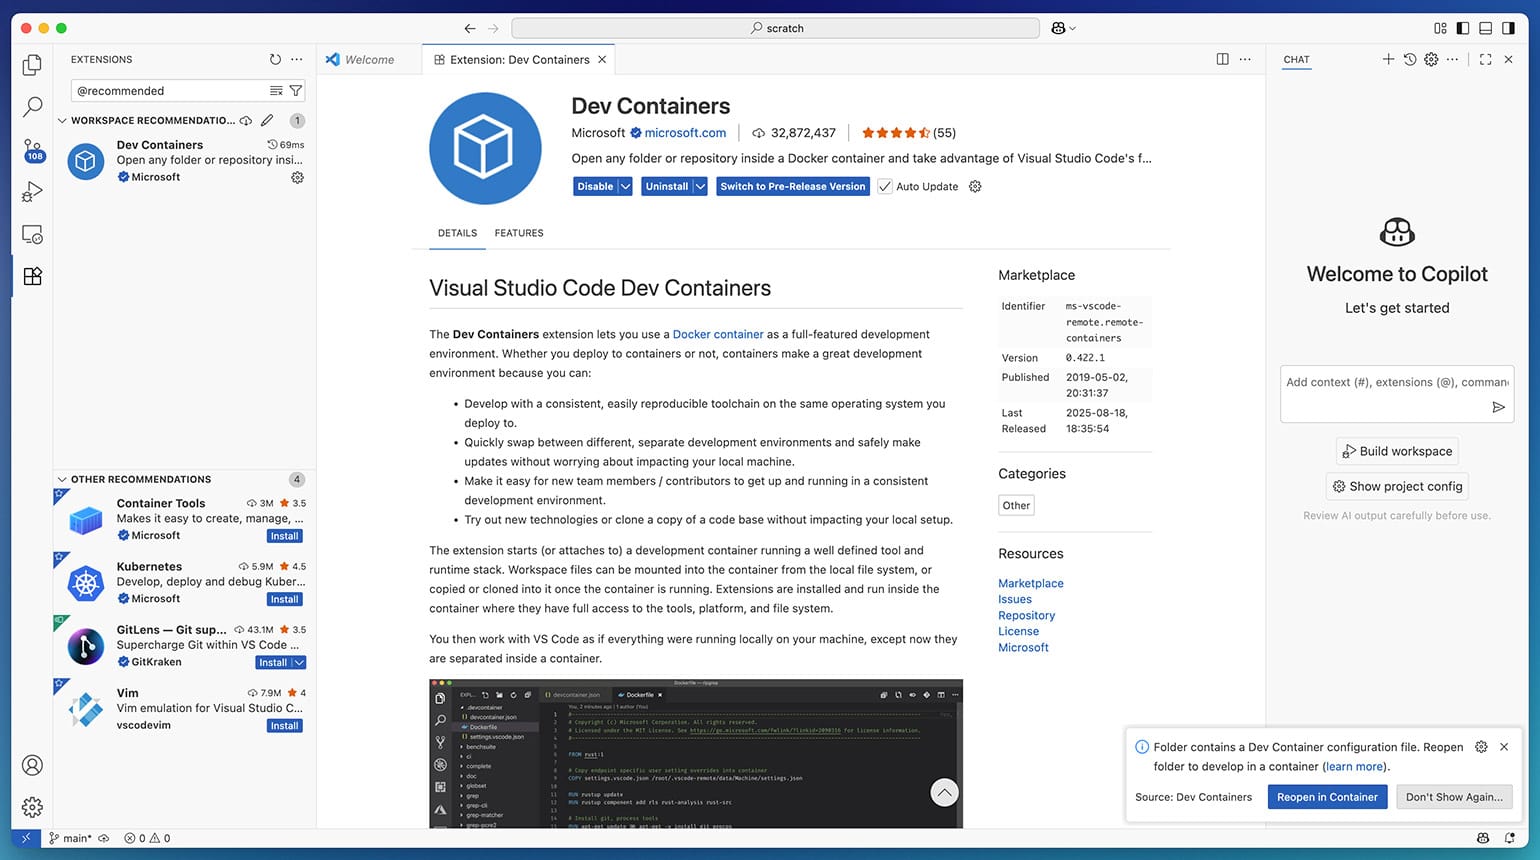
If you run this for the first time you’ll be asked whether you want to install the Dev Containers extension. Click install:
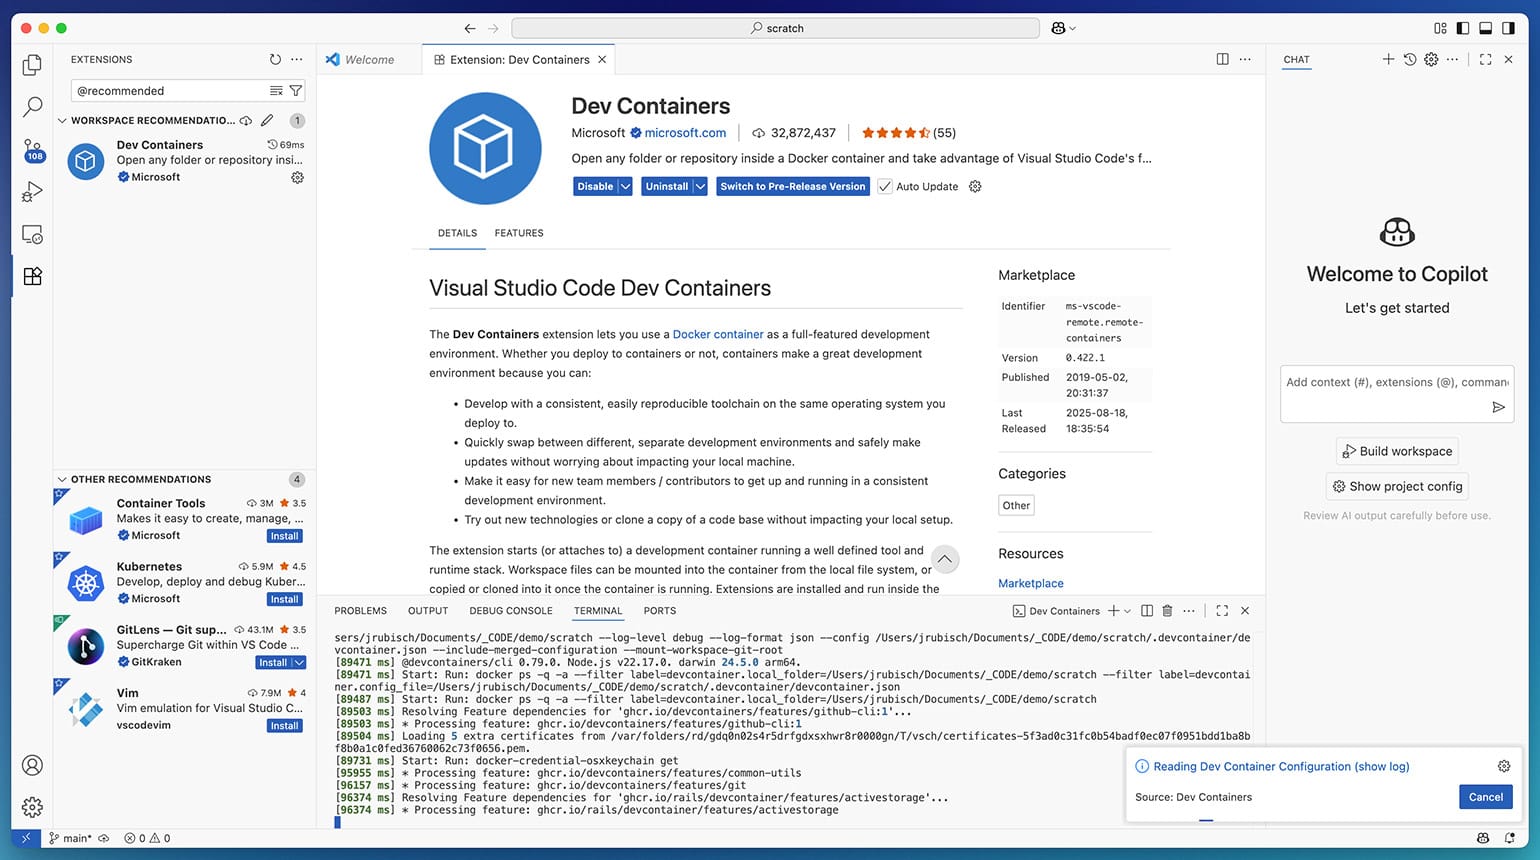
Next VS Code detects that your application has a dev container setup and asks you if you want to start it and reopen the folder from within the container:
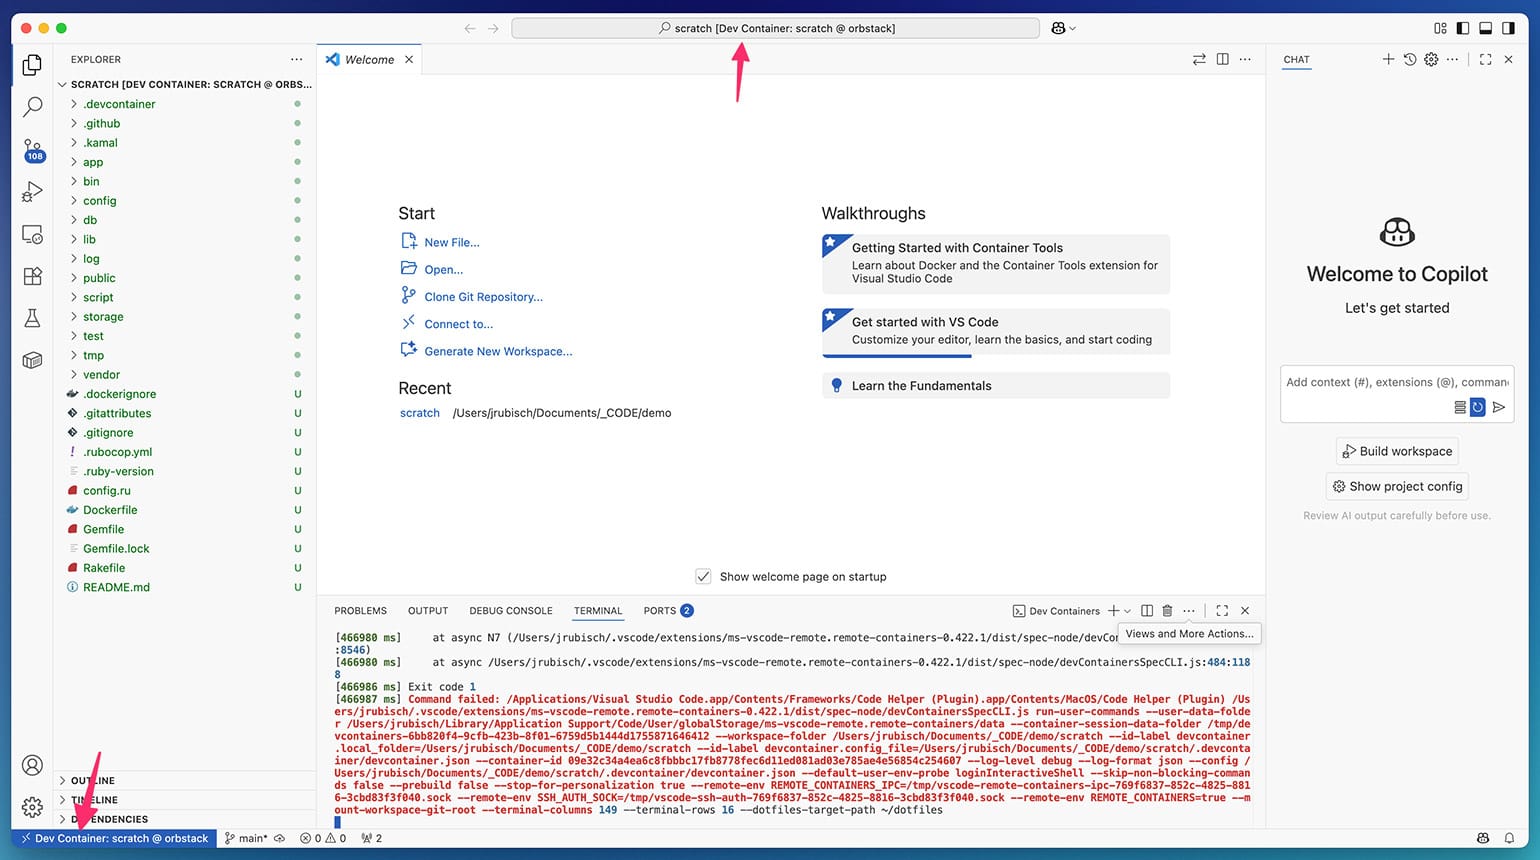
We can now observe how the container is built. From this moment forward, our editor works from inside the container, which is an important shift of the mental model. The terminal and all other tools are now referring to tools and packages that are available through the Docker image:
There’s an indicator in the top bar and in the bottom left to make you aware of this fact:
Additionally, we can verify that this container is running from a terminal of our host computer:
$ docker ps
CONTAINER ID   IMAGE                                                                    COMMAND                  CREATED         STATUS         PORTS                          NAMES
09e32c34a4ea   scratch-rails-app                                                        "/bin/sh -c 'echo Co…"   3 minutes ago   Up 3 minutes
Let’s now start our barebones Rails application by typing bin/dev into the container’s terminal:
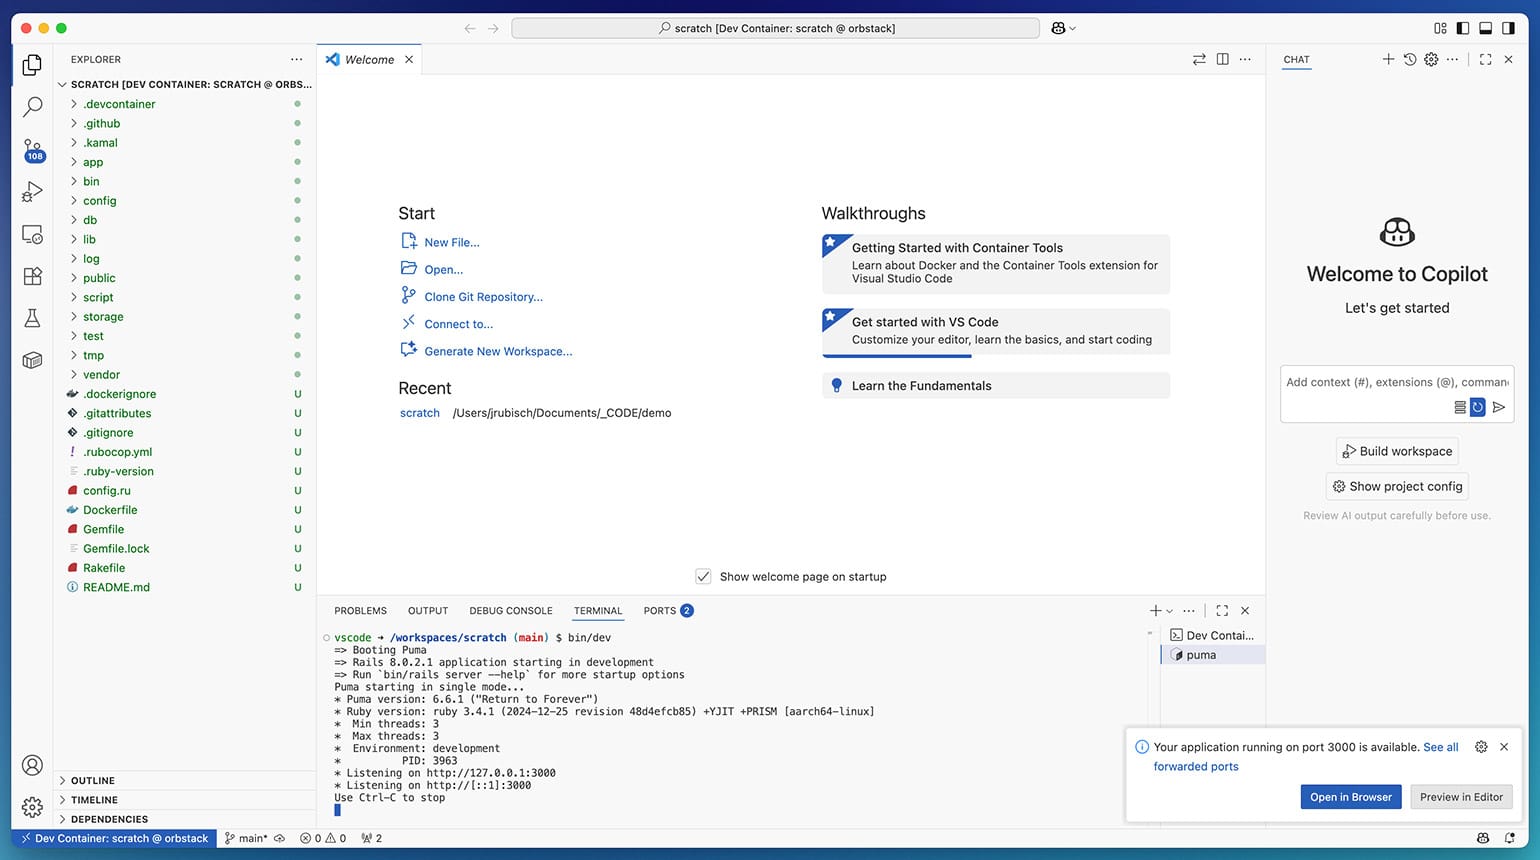
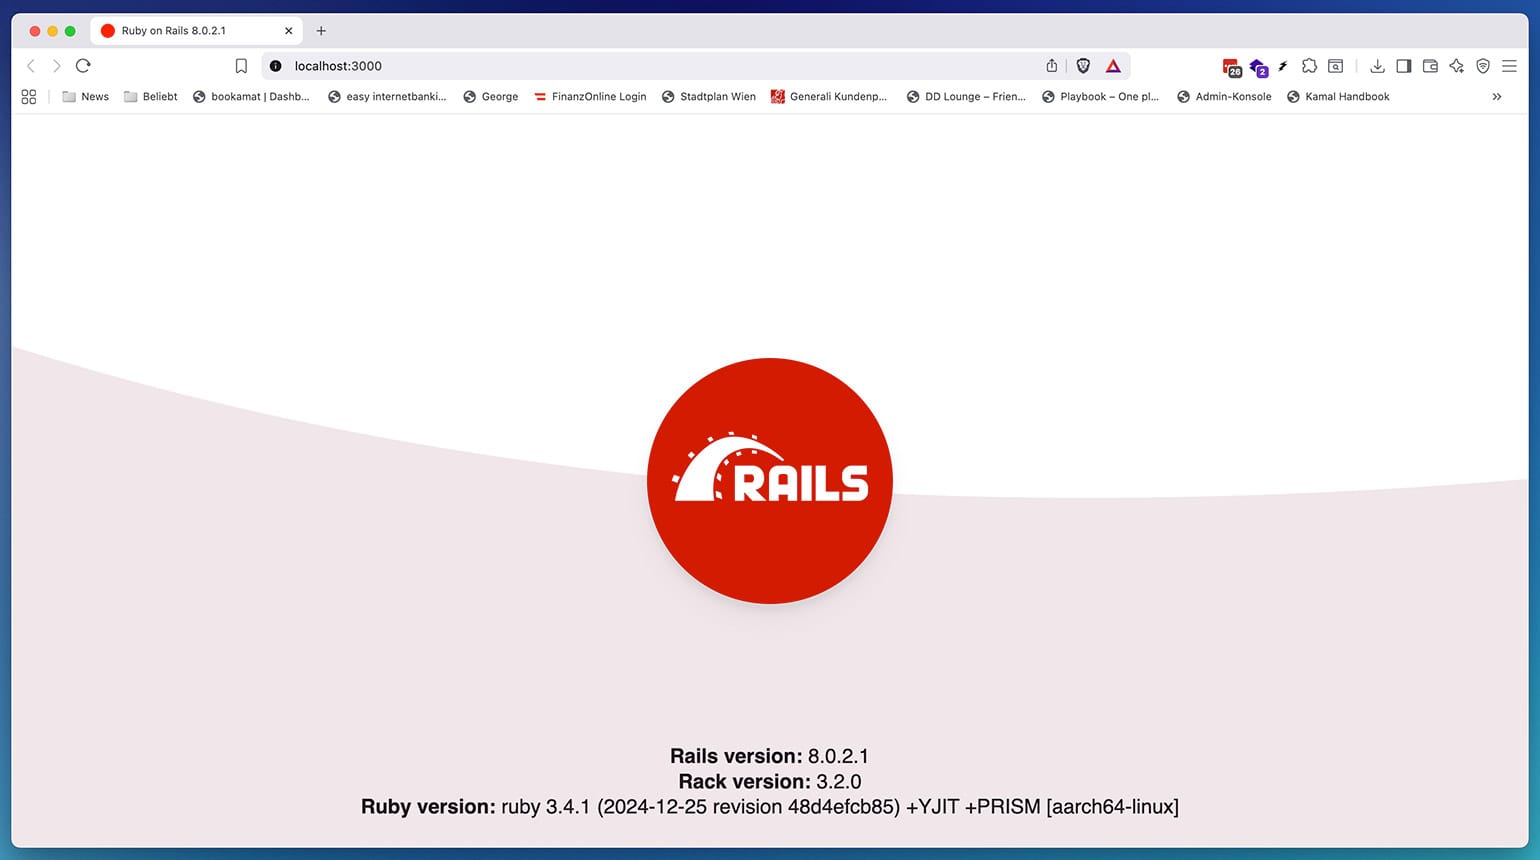
We can verify that it is indeed running by browsing to localhost:3000 on our host computer:
Modifying the Dev Container Setup
In most cases, you will need to adapt this boilerplate to your needs. For example, you might be using jsbundling-rails rather than import maps, which necessitates a NodeJS or Bun runtime. Or maybe you want to simply switch the database engine to a different one than SQLite. You might want to install additional tooling, like linters or formatters, etc.
Let’s start with the simplest case, changing and adding additional features to our dev container. For this, let’s open devcontainer.json and
- exchange
sqlite3forpostgres-client. This will install the necessary libraries to connect your Rails app to a Postgresql database, it will not start a Postgresql server (we’ll deal with that below). - add the
nodefeature. This will, unsurprisingly, install NodeJS. If you need a specific version, you can specify this in the options object, e.g.{"version": "24.6.0"} - as a further example - assuming we are developing an eCommerce site - we add
stripe-cli, which is a 3rd party contributed feature adding Stripe’s CLI.
Here’s the resulting JSON diff:
  {
    // ... rest omitted
    "features": {
      "ghcr.io/devcontainers/features/github-cli:1": {},
      "ghcr.io/rails/devcontainer/features/activestorage": {},
      "ghcr.io/devcontainers/features/docker-outside-of-docker:1": {},
-     "ghcr.io/rails/devcontainer/features/sqlite3": {}
+     "ghcr.io/rails/devcontainer/features/postgres-client": {},
+     "ghcr.io/devcontainers/features/node:1": { "version": "24.6.0" },
+     "ghcr.io/nullcoder/devcontainer-features/stripe-cli:latest": {}
    },
  }
Our customization experiment does not end here. There might be other runtime requirements or setup you’d want to after Docker has finished building the container. We can use a custom .devcontainer/boot.sh script to allow this:
#!/bin/bash

gem install overmind
npm i -g prettier

if [ -S .overmind.sock ]; then
    rm .overmind.sock
fi

bin/setup --skip-server
In this example, we are installing overmind as a process runner to be used instead of foreman. We also check whether there’s a leftover .overmind.sock from previous runs and purge it. Furthermore, we install prettier as a global NPM executable (remember that even though it might exist on your host machine, the container won’t have access to it!). Don’t forget to make this script executable and add it to your devcontainer.json again:
  {
    // rest omitted
-   "postCreateCommand": "bin/setup --skip-server"
+   "postCreateCommand": ".devcontainer/boot.sh"
  }
Now it’s time to tweak the compose.yaml a bit. One of the first things that bit me when working from inside the container was that whenever I wanted to do a git push or git pull, it asked me for my credentials. The reason, of course, is obvious: While I’m using my SSH key on the host machine, the container can’t use it because it’s not present. We are going to change this by mounting the SSH configuration as bind mounts:
  services:
    rails-app:
      build:
        context: ..
        dockerfile: .devcontainer/Dockerfile

      volumes:
      - ../..:/workspaces:cached
+     - $HOME/.ssh/id_ed25519:/home/vscode/.ssh/id_ed25519:ro
+     - $HOME/.ssh/id_ed25519.pub:/home/vscode/.ssh/id_ed25519.pub:ro
+     - $HOME/.ssh/known_hosts:/home/vscode/.ssh/known_hosts:ro
+     - ./ssh/config:/home/vscode/.ssh/config:ro
  # rest omitted
I’m intentionally mounting single files from my host computer ($HOME/.ssh/...) to make sure I’m not accidentally exposing too much. Moreover, each file is mounted in readonly mode (/home/vscode/.ssh/id_ed25519:ro) to make sure it’s not accidentally altered from within the container. So the files and directories made available here are: The private and public SSH keys as well as the known_hosts file, and a custom SSH config living inside the .devcontainer directory in a ssh subfolder:
Host github.com
  HostName github.com
  User git
  IdentityFile ~/.ssh/id_ed25519
  IdentitiesOnly yes
The reason we need to use a custom SSH config is, because your host computer’s might include directives that are invalid on Linux (e.g. Mac OS uses a custom UseKeychain command). Also, we make it intentionally restrictive to work only with github.com as a host. Obviously you’ll want to change this to gitlab.com etc. if you are working with a different Git provider.
We’re not done with our changes yet, though. Remember that we included the Postgresql client as a feature? Now it’s time to add its counterpart - a Postgresql server. To achieve this, we’ll add a new service called db and make our rails-app service depend on it:
  services:
    rails-app:
      # rest omitted

      depends_on:
        - selenium
+       - db

+   db:
+     image: postgres:16
+     restart: unless-stopped
+     volumes:
+       - postgres_data:/var/lib/postgresql/data
+     ports:
+       - 5432:5432
+     environment:
+       POSTGRES_PASSWORD: postgres
+       POSTGRES_USER: postgres
+       POSTGRES_DB: scratch_development

  # selenium service omitted

+ volumes:
+   postgres_data:
Important: Note that I’ve mapped Postgresql’s data folder to a volume called postgres_data. This ensures that our database tables and records survive a container restart!
We can also modify the Dockerfile contained in the .devcontainer folder. We’ll return to that later when we discuss adding AI features such as MCP servers to our container.
Run Your Application in VS Code or Cursor
We have already seen what happens when we open our app’s root folder in VS Code (the same applies to Cursor): The first time, our container needs to be built, which can take some time. But unless you manually remove this container, it will always be ready to be started in the background.
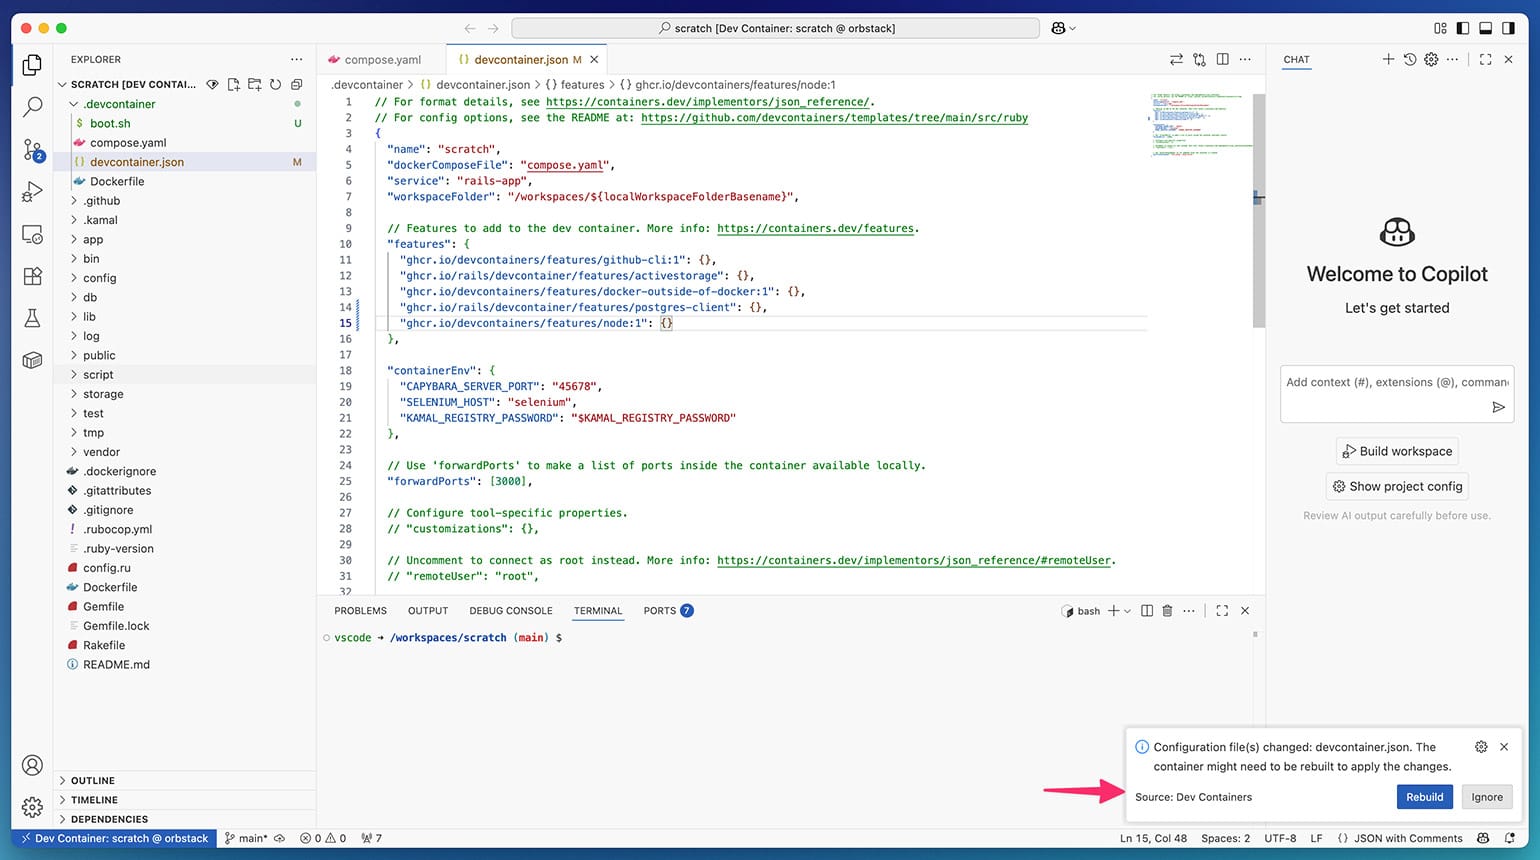
Since we’ve made changes to our container’s configuration, we might want to rebuild it, though. Thankfully, VS Code will detect any configuration changes and suggest a rebuild. In case it does not, summon the command palette with CMD|CTRL+Shift+P and type “Rebuild”:
We can choose between rebuilding our container with or without cache - with cache is fine for now. The container will then download and install the missing features, start the database service as a second container, and run our modified startup script.
All that’s left to do is start our application with bin/dev from the terminal again, or interact with it via the Rails console in another terminal tab, etc.
Run Your Dev Containers Using devcontainer-cli
While dev containers have been pioneered by Microsoft to smoothly integrate with their VS Code editor, there are a variety of other tools supporting it. The most barebones yet flexible of them is probably the command line interface, which is a reference implementation and can be used standalone, or implemented into other editors or services. Let’s dive into how to use it!
It’s written in NodeJS, and thus has to be installed via npm first:
$ npm install -g @devcontainers/cli
There are a few basic commands for configuring and building a container from a given .devcontainer.json file. Most of those will sound familiar if you have some prior experience with Docker, but let’s go through them one by one:
devcontainer build
Use this command to build a fresh dev container, for example in case your configuration has changed. As of the time of writing this article, you have to specify the workspace folder by passing the --workspace-folder option. Assuming we are in the Rails app’s root directory, run:
$ devcontainer build --workspace-folder .
This will resolve all feature dependencies, pull the required base image(s) and build the image. Here is some shortened example output:
[3 ms] @devcontainers/cli 0.77.0. Node.js v24.2.0. darwin 24.5.0 arm64.
[406 ms] Start: Run: docker compose -f /REDACTED/Documents/_CODE/demo/scratch/.devcontainer/compose.yaml --profile * config
...
[568 ms] Start: Run: docker inspect --type image ghcr.io/rails/devcontainer/images/ruby:3.4.1
[812 ms] Start: Run: docker-credential-osxkeychain get
[1279 ms] * Processing feature: ghcr.io/devcontainers/features/common-utils
[1486 ms] * Processing feature: ghcr.io/devcontainers/features/git
[1699 ms] Resolving Feature dependencies for 'ghcr.io/rails/devcontainer/features/activestorage'...
[1700 ms] * Processing feature: ghcr.io/rails/devcontainer/features/activestorage
[1934 ms] Resolving Feature dependencies for 'ghcr.io/devcontainers/features/docker-outside-of-docker:1'...
[1934 ms] * Processing feature: ghcr.io/devcontainers/features/docker-outside-of-docker:1
[2155 ms] * Processing feature: ghcr.io/devcontainers/features/common-utils
...
[2578 ms] * Fetching feature: docker-outside-of-docker_0_oci
[2854 ms] Files to omit: ''
[2867 ms] * Fetched feature: docker-outside-of-docker_0_oci version 1.6.3
[2867 ms] * Fetching feature: github-cli_1_oci
[3117 ms] Files to omit: ''
[3123 ms] * Fetched feature: github-cli_1_oci version 1.0.14
[3123 ms] * Fetching feature: activestorage_2_oci
[3392 ms] Files to omit: ''
[3396 ms] * Fetched feature: activestorage_2_oci version 1.1.1
...
[3659 ms] Start: Run: docker compose --project-name scratch -f /REDACTED/Documents/_CODE/demo/scratch/.devcontainer/compose.yaml -f /var/folders/rd/gdq0n02s4r5drfgdxsxhwr8r0000gn/T/devcontainercli/docker-compose/docker-compose.devcontainer.build-1756363970564.yml build rails-app
[+] Building 7.0s (22/22) FINISHED
 ...
 => exporting to docker image format                                                               5.3s
 => => exporting layers                                                                            0.0s
 => => preparing layers for inline cache                                                           0.0s
 => => exporting manifest sha256:76dd4757ae190064e45ddc920db96efbaa7f493cebc5d21531a90c1961614bbe  0.0s
 => => exporting config sha256:418bcfe5c8abef283769884c99fb5ccaf7127876573e9c7076ee67e5f8d08926    0.0s
 => => sending tarball                                                                             5.3s
 => importing to docker                                                                            0.0s
 => resolving provenance for metadata file                                                         0.0s
[+] Building 1/1
 ✔ scratch-rails-app  Built                                                                        0.0s
{"outcome":"success","imageName":"scratch-rails-app"}
There are other options you can pass to it (refer to the whole list by running devcontainer build --help), but the one you are probably going to need most often is --no-cache, which discards any cached Docker layers and builds the image from a clean slate.
devcontainer up
This command spins up all the containers specified in your compose.yaml and applies the settings in .devcontainer.json. After booting the app container, the our postCreateCommand (boot.sh) is run, guaranteeing all new or updated libraries are installed and database migrations applied.
$ devcontainer up --workspace-folder=.
[0 ms] @devcontainers/cli 0.80.0. Node.js v24.6.0. darwin 24.5.0 arm64.
[113 ms] Start: Run: docker compose -f /REDACTED//scratch/.devcontainer/compose.yaml --profile * config
[192 ms] Start: Run: docker compose --project-name scratch -f /REDACTED/scratch/.devcontainer/compose.yaml -f /REDACTED/Library/Application Support/Code/User/globalStorage/ms-vscode-remote.remote-containers/data/docker-compose/docker-compose.devcontainer.build-1756370747136.yml -f /REDACTED/Library/Application Support/Code/User/globalStorage/ms-vscode-remote.remote-containers/data/docker-compose/docker-compose.devcontainer.containerFeatures-1756370753846-07419786-80c4-4e44-8a84-43029d06745e.yml up -d --no-recreate
[+] Running 3/3
 ✔ Container scratch-db-1         Started                                                                                                                               0.1s
 ✔ Container scratch-selenium-1   Started                                                                                                                               0.1s
 ✔ Container scratch-rails-app-1  Started                                                                                                                               0.1s
{"outcome":"success","containerId":"7e81450c02f4e37d3780d094c086f3fb65810b183362a13bce616e914d42805e","composeProjectName":"scratch","remoteUser":"vscode","remoteWorkspaceFolder":"/workspaces/scratch"}
We can once again manually verify that all defined containers are running with docker ps:
docker ps
CONTAINER ID   IMAGE                           COMMAND                  CREATED         STATUS         PORTS                                         NAMES
7e81450c02f4   scratch-rails-app               "/bin/sh -c 'echo Co…"   7 minutes ago   Up 5 minutes                                                 scratch-rails-app-1
008f68a3c251   postgres:16                     "docker-entrypoint.s…"   7 minutes ago   Up 5 minutes   0.0.0.0:5432->5432/tcp, [::]:5432->5432/tcp   scratch-db-1
851c5e4e13e9   selenium/standalone-chromium    "/opt/bin/entry_poin…"   5 days ago      Up 5 minutes   4444/tcp, 5900/tcp, 9000/tcp                  scratch-selenium-1
devcontainer exec
To actually use our container for developing, we have to start our application. We employ devcontainer exec for this, specifying the command to be run.
There’s a major obstacle that has to be overcome first: As of today, port forwarding is not supported by the CLI. This simply means that the forwardPorts option in our configuration is ignored, and we have to help out manually.
First, we have to tell compose.yaml that our Rails app container actually binds to port 3000:
  services:
    rails-app:
      build:
        context: ..
        dockerfile: .devcontainer/Dockerfile
+     ports:
+       - "3000:3000"
  # etc.
Then we have to restart the container. Since the devcontainer down command isn’t yet implemented, we have to manually kill and remove the main app container:
$ docker kill 7e81450c02f4
$ docker rm 7e81450c02f4
Now we can restart it with devcontainer up --workspace-folder=. and observe that the freshly booted container listens on port 3000:
$ docker ps
CONTAINER ID   IMAGE                           COMMAND                  CREATED          STATUS          PORTS                                         NAMES
21b7a7294aa6   scratch-rails-app               "/bin/sh -c 'echo Co…"   10 seconds ago   Up 10 seconds   0.0.0.0:3000->3000/tcp, [::]:3000->3000/tcp   scratch-rails-app-1
The final step is to bind the Puma process in your dev container to listen globally, i.e. on 0.0.0.0 instead of the usual 127.0.0.1, which would only be accessible from inside the container:
$ devcontainer exec --workspace-folder=. bin/dev -b 0.0.0.0
=> Booting Puma
=> Rails 8.0.2.1 application starting in development
=> Run `bin/rails server --help` for more startup options
Puma starting in single mode...
* Puma version: 6.6.1 ("Return to Forever")
* Ruby version: ruby 3.4.1 (2024-12-25 revision 48d4efcb85) +YJIT +PRISM [aarch64-linux]
*  Min threads: 3
*  Max threads: 3
*  Environment: development
*          PID: 2496
* Listening on http://0.0.0.0:3000
Now we’re ready to develop! Note that the exec command can also be used to summon a Rails console, or plain container shell:
$ devcontainer exec --workspace-folder=. bin/rails c
Loading development environment (Rails 8.0.2.1)
scratch(dev)>

$ devcontainer exec --workspace-folder=. bash
vscode ➜ /workspaces/scratch (main) $
Run Your Dev Containers in GitHub Codespaces
If you are hosting your code on GitHub, you can run you dev containers in the cloud by using codespaces.
Doing that is easy: Simply push your code to a repository, then start a new codespace from the UI:

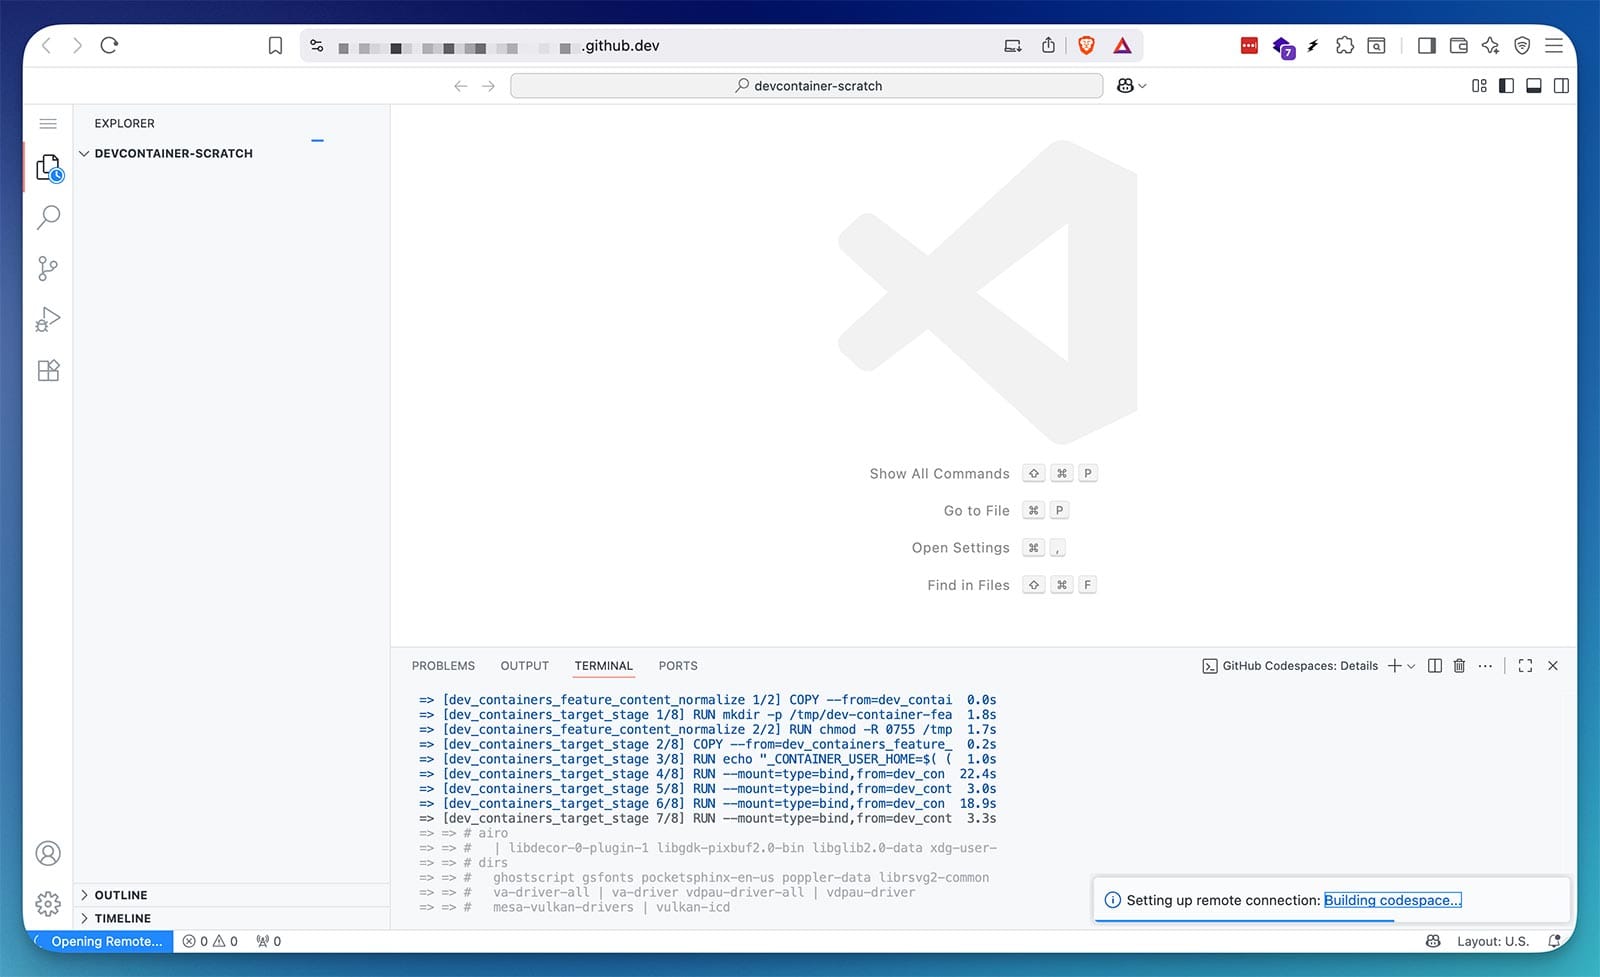
Once you do that, a GitHub.dev editor will open, which looks familiar:
In fact, it’s a cloud version of VS Code, allowing you to use the same interface you are used to from working locally. You can observe how it builds the container(s) just like before - only this time it’s served from the cloud:
Once it’s done, we can confirm that all containers are running by clicking on the “Containers” tab on the left:

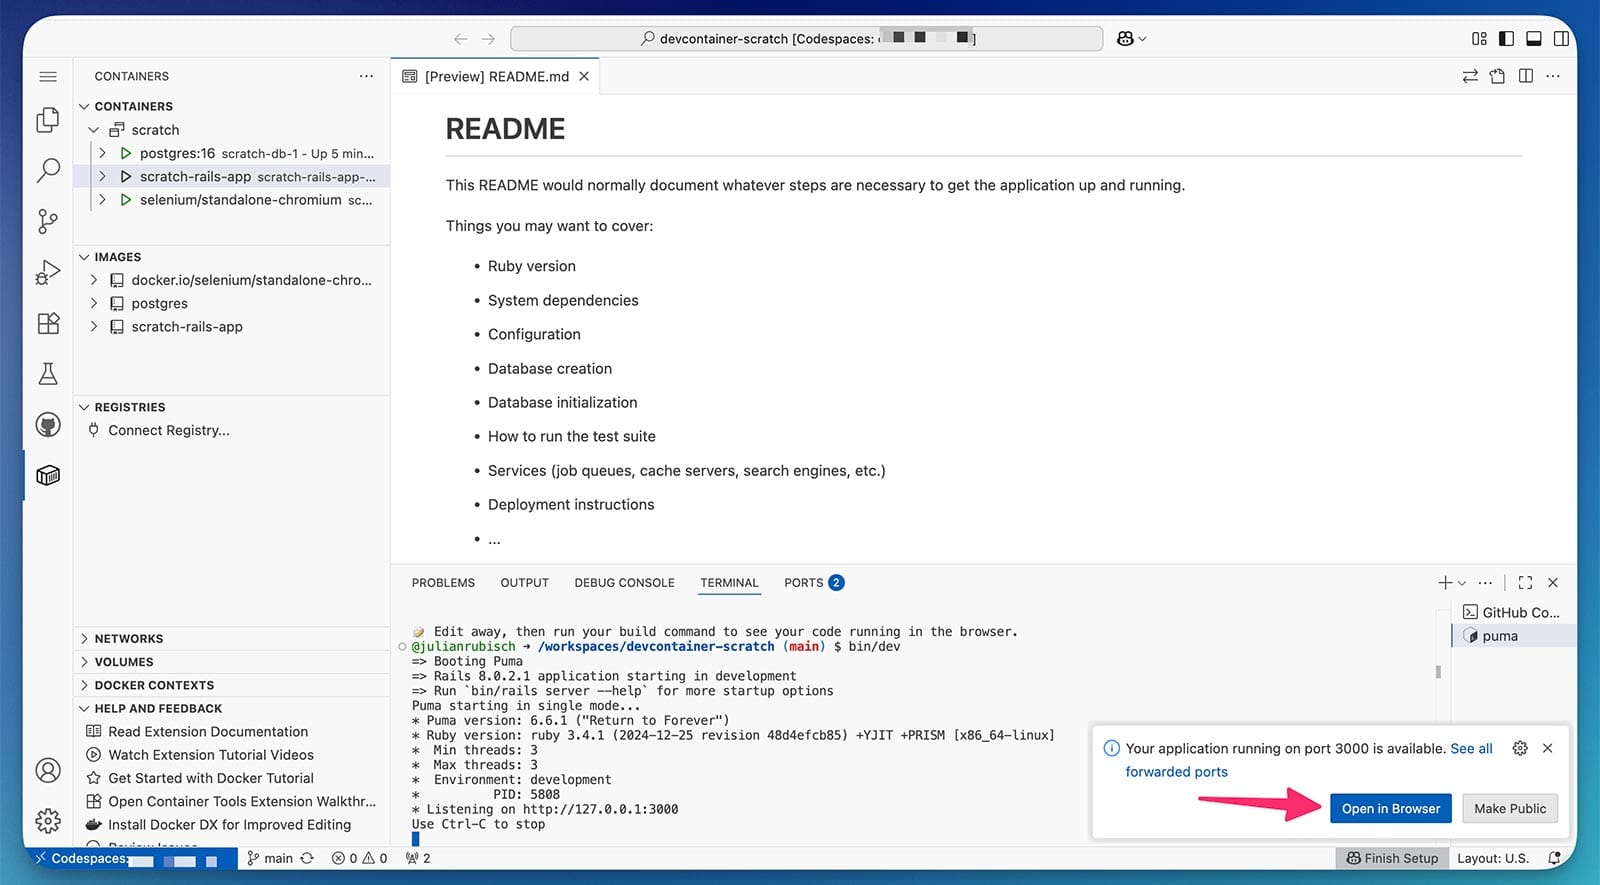
To run the application and open it in a browser, we have to employ the same trick as before. Because puma binds to 127.0.0.1 by default - which we cannot use - we have to use bin/dev to allow global access:
bin/dev -b 0.0.0.0
Once the app is running, the codespace will prompt you to open the running application privately in a browser tab:
To dive deep into the details, I recommend perusing the official docs for creating and managing codespaces.
Bonus: Setting Up Cursor with Support for the Rails Model Context Protocol (MCP) Server
In this section we are going to swap VS Code for Cursor and configure some MCP servers to assist its chat agent. Since Cursor is a VS Code fork, we can build the configuration we’ve assembled so far.
The servers we are going to run are the following:
- Rails MCP Server. This enables Cursor to directly gather information about the Rails app you are developing via tools such as
get_routes,analyze_models,load_guide, and a couple more. In my experience, this has been pivotal in Cursor correctly understanding your application’s architecture - Context7, which an up-to-date directory of code documentation especially for LLMs. Cursor can look up and gather information about any library (Ruby, Javascript, or other) that your application uses.
- GitHub. Essentially this MCP server allows to interact with the whole GitHub API, be it creating pull requests, fetching and parsing issues, discussion etc. If you use GitHub you should use it to alleviate communicating with its API. In this example configuration, we are going to employ the remote server at https://api.githubcopilot.com/mcp/, which necessitates a personal access token.
- Postgres, for debugging performance issues, suggesting indexes, concocting the odd SQL statement in case you need it, etc.
The configuration located at .cursor/mcp.json looks as follows:
{
    "mcpServers": {
        "rails": {
            "command": "rails-mcp-server",
            "type": "command"
        },
        "context7": {
            "command": "npx",
            "args": [
                "-y",
                "@upstash/context7-mcp"
            ]
        },
        "github-remote": {
            "url": "https://api.githubcopilot.com/mcp/",
            "headers": {
              "Authorization": "Bearer GITHUB_PAT"
            }
        },
        "postgres": {
            "command": "uvx",
            "args": [
                "postgres-mcp",
                "--access-mode=unrestricted"
            ],
            "env": {
                "DATABASE_URI": "postgresql://postgres:postgres@db:5432/scratch_development"
            }
        }
    }
}
You can tell from this file that our MCP servers have different prerequisites. One (Rails) is its own executable, others like context7 or postgres rely on npm or uv being present, and GitHub calls a remote API. Therefore, we have to equip our dev container with the relevant executables.
First, we are going to need a Python interpreter in our container. This is simple, because there’s a first party python feature we just have to add to our devcontainer.json and rebuild the container:
    "features": {
      "ghcr.io/devcontainers/features/github-cli:1": {},
      "ghcr.io/rails/devcontainer/features/activestorage": {},
      "ghcr.io/devcontainers/features/docker-outside-of-docker:1": {},
      "ghcr.io/rails/devcontainer/features/postgres-client": {},
      "ghcr.io/devcontainers/features/node:1": { "version": "24.6.0" },
+     "ghcr.io/devcontainers/features/python:1": {},
    },
Second, rails-mcp-server is a standalone gem. In our case here I chose to install it in .devcontainer/boot.sh:
+ gem install rails-mcp-server
This MCP server expects a configuration file enumerating the projects it is going to provide information about. In our case, since the container is isolated, there’s only one project. We create a new folder called rails-mcp inside .devcontainer and add the following file:
# Rails MCP Projects
# Format: project_name: /path/to/project
scratch: /workspaces/scratch
Because the .devcontainer directory is ignored when building a Dockerfile, we have to manually enable the rails-mcp subdirectory in .dockerignore:
  # ...

  # Ignore development files
  /.devcontainer
+ !/.devcontainer/rails-mcp/

  # ...
Finally, we have to make a couple of adaptations to the Dockerfile. The uv Python package manager provides an installer we can use. Furthermore, after having created a Rails MCP configuration in the previous step, we now have to copy it into the expected location at ~/.config/rails-mcp:
  # Make sure RUBY_VERSION matches the Ruby version in .ruby-version
  ARG RUBY_VERSION=3.4.4
  FROM ghcr.io/rails/devcontainer/images/ruby:$RUBY_VERSION

+ RUN curl -LsSf https://astral.sh/uv/install.sh | sh
+
+ RUN mkdir -p /home/vscode/.config/rails-mcp
+ COPY .devcontainer/rails-mcp/projects.yml /home/vscode/.config/rails-mcp/projects.yml
With this all set up, we can let Cursor rebuild the container, upon which we should be able to access the MCP servers we specified. To confirm this, open the Cursor Settings and go to “MCP & Integrations”:
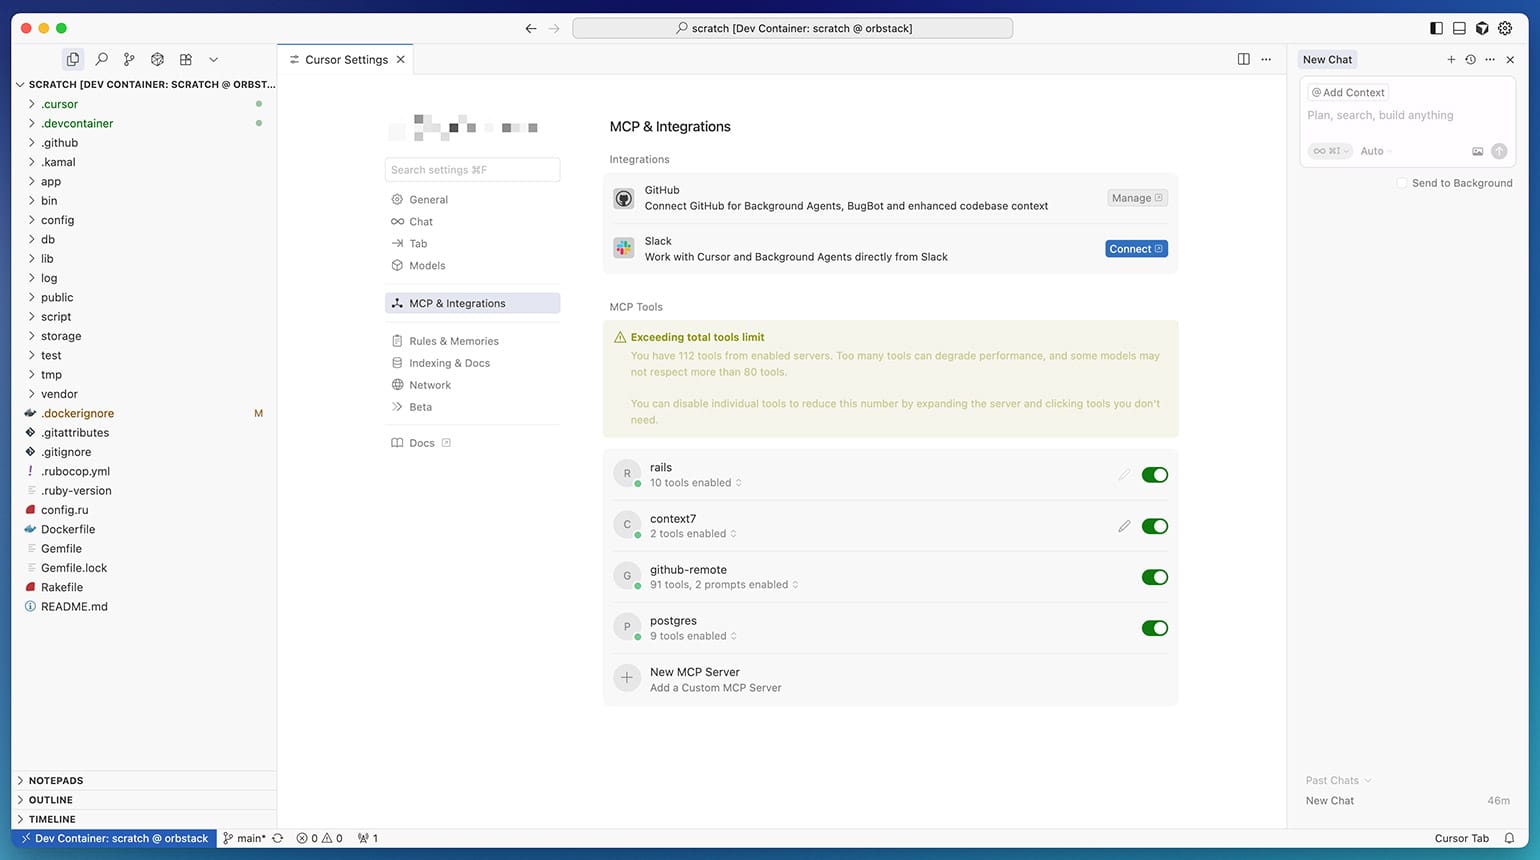
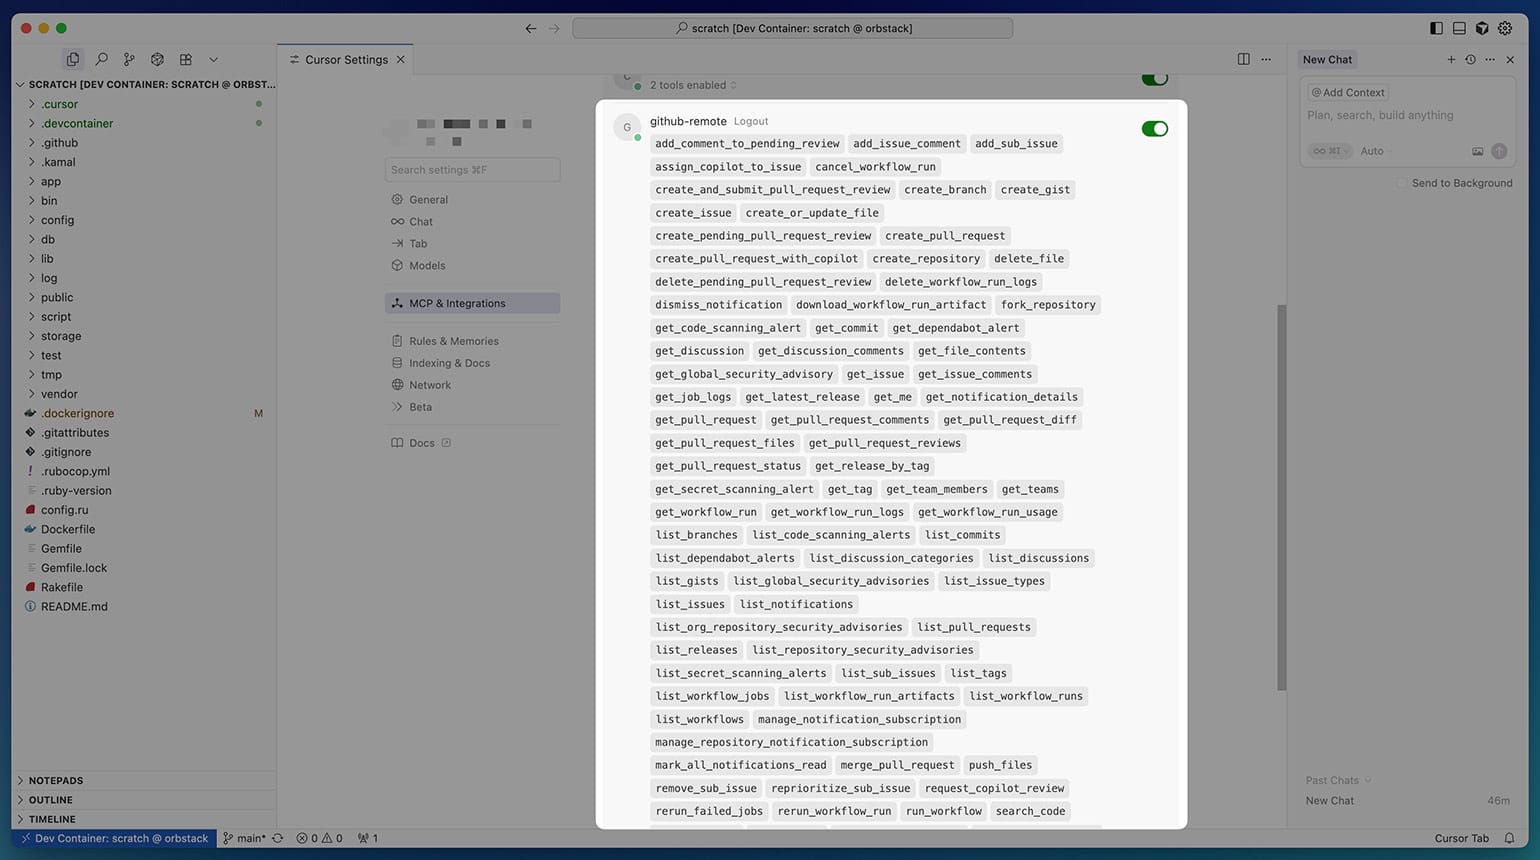
As you can see, Cursor spits out a warning about the total number of MCP tools that are running. In fact, the GitHub server offers 91 tools at the time of writing (and they keep constantly adding new ones). You can safely disable all thetools you aren’t using by expanding the list and toggling them off:
Conclusion
In this article we walked through the basics of dev containers, starting with a minimal Ruby setup and then exploring the Rails --devcontainer scaffold. We unpacked the key files (devcontainer.json, compose.yaml, Dockerfile), looked at how Features and Templates work, and customized the environment with extra tools, SSH access, and a Postgres service. Finally, we saw how to run the setup in VS Code, Cursor, the devcontainer CLI, and even GitHub Codespaces, and extended it with advanced integrations like MCP servers.
In summary, dev containers aren’t just a convenience feature for VS Code or Codespaces - they’re a way to standardize and simplify Rails development across teams, editors, and machines. By committing a .devcontainer setup to your project, you eliminate the “works on my machine” problem, speed up onboarding, and ensure that every contributor shares the same toolchain.

